
You know how it goes: you get a new idea, a new project to automate. So, you create an automation. Before you know it, you have two or three automations that are very similar—like one automation to turn on your kitchen lights and another to turn them off, or separate automations for "home" and "away" modes. Before long, you have a hundred automations.
What if I told you that you could combine some of these into a single automation and reduce your total automation count by 25% or even 50%? In this post, we’ll dive deep into Trigger IDs and how to use them effectively.
The Automation:
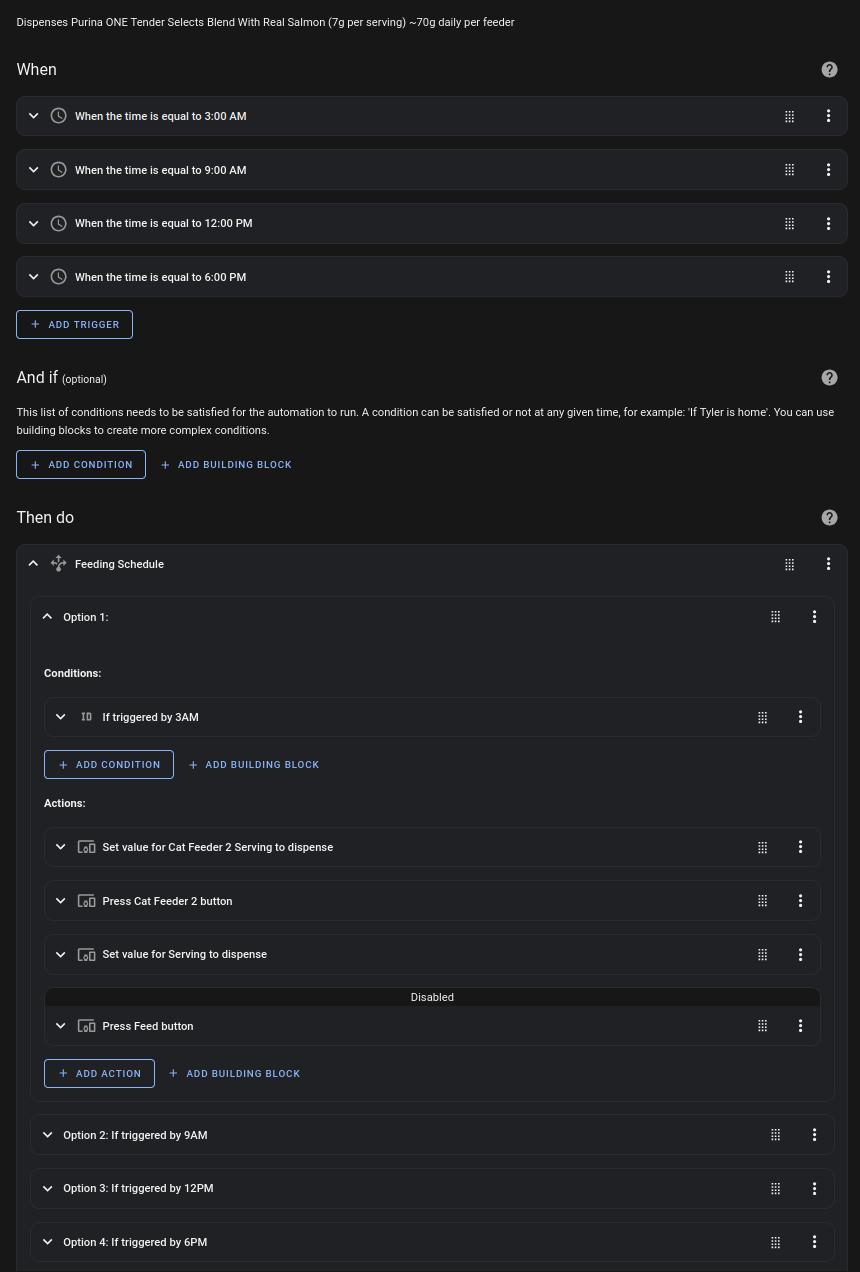
Here’s an example from my Cat Feeder Schedule. I feed my cats four times a day. Normally, I wouldn’t need Trigger IDs—you could just set up multiple triggers with a single action to dispense the food. So why use Trigger IDs?
I prefer to give my cats smaller meals in the middle of the night and midday compared to their morning and evening meals. This would typically require multiple automations because of the differing feeding amounts. However, with Trigger IDs, we can combine everything into one automation.
The logic works like so:
1. Automation gets triggered by time of day (9 AM, 12PM etc)
2. The logic flow goes through each action and looks at it's associated condition.
3. If the condition is not met it moves on to the next action till a conditon is met.
4. Once a condition is met (Trigger ID match in this example) It runs the action.
alias: Cat Feeder Schedule (7g/serv | 70g/day)
description: >-
  Dispenses Purina ONE Tender Selects Blend With Real Salmon (7g per serving)
  ~70g daily per feeder
triggers:
  - at: "03:00:00"
    trigger: time
    enabled: true
    id: 3AM
  - at: "09:00:00"
    trigger: time
    enabled: true
    id: 9AM
  - at: "12:00:00"
    trigger: time
    enabled: true
    id: 12PM
  - at: "18:00:00"
    trigger: time
    enabled: true
    id: 6PM
conditions: []
actions:
  - alias: Feeding Schedule
    choose:
      - conditions:
          - condition: trigger
            id: 3AM
        sequence:
          - device_id: Cat Feeder 1
            domain: number
            entity_id: Feeder 1 Portion Size
            type: set_value
            value: 4
          - device_id: Cat Feeder 1
            domain: button
            entity_id: Feeder 1 Dispense Button
            type: press
      - conditions:
          - condition: trigger
            id: 9AM
        sequence:
          - device_id: Cat Feeder 1
            domain: number
            entity_id: Feeder 1 Portion Size
            type: set_value
            value: 6
          - device_id: Cat Feeder 1
            domain: button
            entity_id: Feeder 1 Dispense Button
            type: press
      - conditions:
          - condition: trigger
            id: 12PM
        sequence:
          - device_id: Cat Feeder 1
            domain: number
            entity_id: Feeder 1 Portion Size
            type: set_value
            value: 4
          - device_id: Cat Feeder 1
            domain: button
            entity_id: Feeder 1 Dispense Button
            type: press
      - conditions:
          - condition: trigger
            id: 6PM
        sequence:
          - device_id: Cat Feeder 1
            domain: number
            entity_id: Feeder 1 Portion Size
            type: set_value
            value: 6
          - device_id: Cat Feeder 1
            domain: button
            entity_id: Feeder 1 Dispense Button
            type: press
mode: single
The Magic Sauce
Take a look at one of the triggers: You’ll see an ID, called "3AM."
triggers:
  - at: "03:00:00"
    trigger: time
    enabled: true
    id: 3AM
Now look at the Action section of this Automation:
actions:
  - alias: Feeding Schedule
    choose:
      - conditions:
          - condition: trigger
            id: 3AM
        sequence:
          - device_id: Cat Feeder 1
            domain: number
            entity_id: Feeder 1 Portion Size
            type: set_value
            value: 4
          - device_id: Cat Feeder 1
            domain: button
            entity_id: Feeder 1 Dispense Button
            type: press
      - conditions:
          - condition: trigger
            id: 9AM
We’re using a "choose" action combined with "triggered by" conditions. If you’re not familiar with the "Choose" action, think of it as a more powerful version of if-then-else statements. This allows us to select the correct feeding action based on which trigger activated the automation.
This allows us to choose the correct feeding action based on which trigger ran the automation. Pretty neat!
Conclusion:
I hope this post clears up how to use Trigger IDs. They’re an incredibly powerful tool for simplifying and organizing your automations. By reducing the number of automations, you can make your setup more efficient, easier to manage, and less prone to errors. With fewer automations to maintain, you’ll save time and enjoy the process of automation even more. Trigger IDs can be a game-changer for your automation workflow.