One very useful way to truly make your home feel like a smart home is to have it know where you are and when. It can be as simple as getting a notification when your kids get off the school bus and arrive home or automatically setting the thermostat to "away" mode and turning off all lights 5 minutes after you leave the house.
In this blog post, we will be using Life360 to handle the tracking. I can already hear some of you clicking off this page, but hang on a second. I will be covering free and open-source ways to achieve this in a future article. For now, considering that many families already use Life360, this guide is for them. Now, with that out of the way...
In this blog post, let's break down the following:
- How to create saved locations
- Track yourself or other family members in Home Assistant
- Use this information in automation
- Unlimited location alerts without Life360 paid plans
Connect Life360 to Home Assistant
- First, download the Life360 Integration from HACS using the button below.

- Restart Home Assistant (Important do not skip!)
- Restart Home Assistant (Important: do not skip this step!).
- Open the Life360 Integration and connect your account. I recommend enabling the "Show driving as state" option.

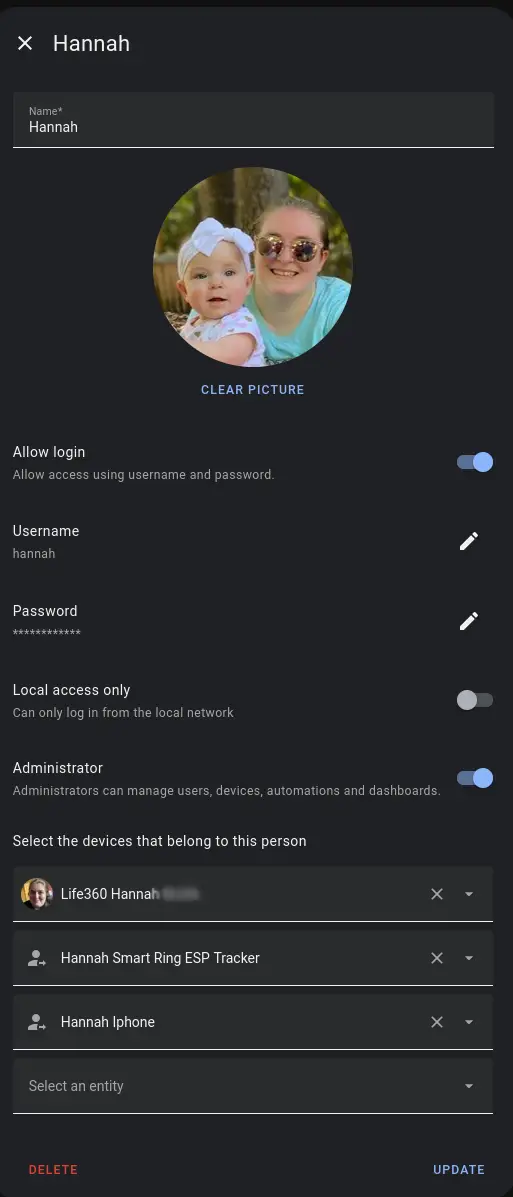
- Tie your Life360 Entities to your Home Assistant Users:
- Go to Settings > People.
- Click on the person you want to track.
- Add the associated Life360 account.
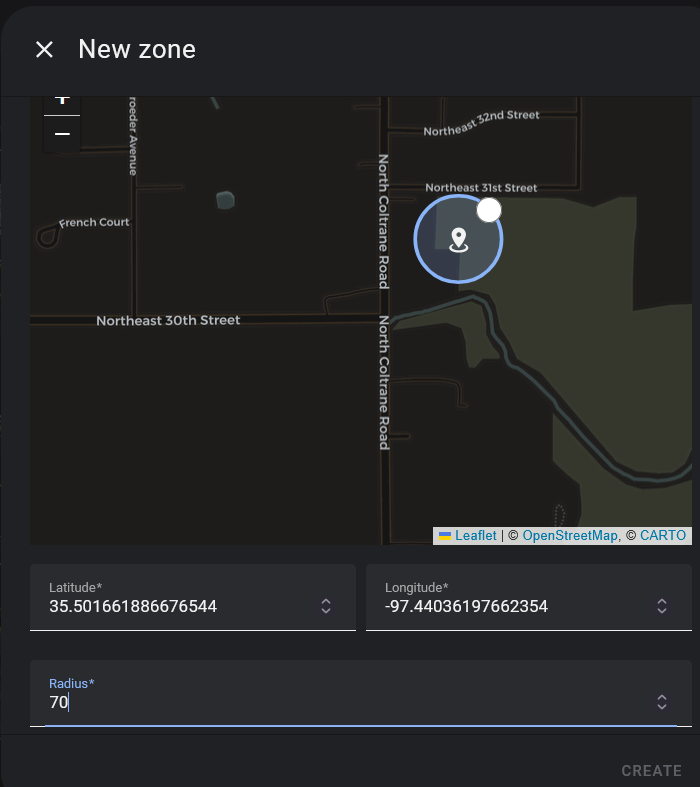
How to create Zones in Home Assistant
Creating a zone is quite simple. You actually create your first zone when setting up Home Assistant for your home location. Here’s how to create new ones for other areas:
- Go to Settings > Areas & Zones > Zones.
- Click Create Zone.
- Drag around the map to find where you'd like to place the zone.
- Adjust the zone radius by dragging the outline in or out. Alternatively, you can enter a specific number in the radius field.
The Automation:
You'll notice in this automation, we are using Trigger IDs. These allow us to tie specific triggers to corresponding actions. I plan to go into more detail about Trigger IDs and their use in advanced automations in another article.
For now, let’s take a look at this automation example:

alias: "!Zone Notifications (Life360) - Daycare"
description: ""
triggers:
  - trigger: zone
    entity_id: person.hannah
    zone: zone.daycare
    event: leave
    id: H-Daycare-Left
  - trigger: zone
    entity_id: person.hannah
    zone: zone.daycare
    event: enter
    id: H-Daycare-Enter
conditions: []
actions:
  - alias: Location Based Notifications
    choose:
      - conditions:
          - condition: trigger
            id:
              - H-Daycare-Enter
          - condition: state
            entity_id: person.hannah
            state: "zone.daycare"
            for: "00:05:00"  # Requires Hannah to be at daycare for 5 minutes
        sequence:
          - action: notify.mobile_app_pixel_8
            data:
              title: Hannah Arrived at Daycare!
              message: Hannah Arrived at Daycare!
      - conditions:
          - condition: trigger
            id:
              - H-Daycare-Left
          - condition: state
            entity_id: person.hannah
            state: "zone.daycare"
            for: "00:05:00"  # Ensures Hannah had been at daycare for at least 5 minutes
        sequence:
          - action: notify.mobile_app_pixel_8
            data:
              title: Hannah Left Daycare!
              message: Hannah Left Daycare!
mode: single
I want to point out the condition in this automation. This prevents false notifications for when she may just happen to be driving by the daycare on the weekend or odd times
condition: state
entity_id: person.hannah
state: zone.daycare
for: "00:05:00"
Conclusion:
This is just the tip of the iceberg for location tracking. I plan to create more articles on this subject, showcasing both simple and advanced automations. Let me know in the comments what automations you have planned!